Monday, November 29, 2010

The new Paper Crafts special issue Card Creations: Favorite Occasions was released recently and I was lucky enough to have a card picked up for it (Thanks Paper Crafts!). Make sure you it out. It's filled with great ideas for the common card making occasions!


A little typography, a lot of stamping and a cute little love card. :)

Thanks for stopping by!

Monday, November 22, 2010

Out of this World Birthday

Last year I made our friend D a birthday card per request of the hubs. When we went to go visit him in the summer, he pulled out my card (that he had saved for at least 6 months) and showed it to everyone in attendance. With that kind of love, how do you not give D a personalized card this year? With that act, he single handedly insured himself a fabulous card every year. 

Since D is a big Star Trek fan, I thought that the spaceship from Half Pint Heroes would be perfect. Now I had tried to come up with some pun relating to trekkie-ness. However, try as I might, nothing was coming to me. I asked the hubs to help but he just had a grand time laughing at my attempts.

Ok, given that I couldn't come up with a pun, the next logical thing is to create a shape card. So I opted for a moon shaped card, which in retrospect wasn't the grandest of plans. It's actually quite a small card given that my largest circle die was 4 1/4 inches wide. I cannot wait to get my hands on a Grand Calibur and some larger dies... That said, I'm very good at writing small and luckily D isn't old enough to need bifocals yet.


A bit of coloring to attempt to personalize the face in the middle and some glossy accents on the windows adds some fun details. Although this is a "winter" version of him... I couldn't get his face dark enough although I did give him some stubble on his chin. ;-) Figured that after studying so hard for his crazy exams that I probably wasn't too wrong on the stubble.  (Also it was when I realized the color I was using was a bit dark for his skin... but shhhhh!)

Happy Belated D! (Sorry we're always late as we just put this card in the mail earlier today..)


Stamps: (Half Pint Heroes) Waltzingmouse Stamps
Cardstock: PTI
Ink: (Tuxedo Black) Tsukineko
Coloring Medium: (markers) Copics
Accents: (gems) Hero Arts, (glossy accents) Ranger
Tools: (star punch) Fiskars, (circle die) Spellbinders

Saturday, November 20, 2010

Love you

My hard drive died recently and with it, all my craft pictures. Since I travel often and usually with only a few day's notice, I have a pile of cards that I use for blog fodder when I'm not around. So for the next few weeks blogging might be a little slower as I need to build up my arsenal of fodder again. I'm also slowly reinstalling all my software. Sigh...  As a public service announcement, be sure to backup your files! :) Although the only thing I really didn't back up is my craft files and I managed to recover most everything else.

Luckily I have the entire next week off -- woohoo for Thanksgiving! :) Although given the state of my little abode, I'm spending most of next week cleaning and then the rest cooking and then cleaning up after my cooking mess. Ah, Thanksgiving.

With the recent holiday stress, it's nice to remind your friends and family that you love them and all the talk about Thanksgiving/Christmas is just temporary. I'm pretty sure my husband wants to rip his ears out right now and would prefer I talk about things aside from turkey. Perhaps I'll give him some earplugs for Christmas...

This is a simple quicky card with a little stamping and some scraps.  I added some pearls to the swirls and to the scalloped border. I really love the look of stamping over stamps but I just don't do it enough. Perhaps that should be remedied.

Anyways, have a great rest of the weekend!

Stamps: (Sweethearts) Waltzingmouse Stamps, (Flourish, Polka Dot Basics 2) PTI
Cardstock, Ribbon: PTI
Accents: (pearls) Hero Arts
Tools: (border punch) Fiskars

Friday, November 19, 2010

Nov/Dec Paper Crafts

I'm just sharing a card I was lucky enough to have picked up for the November/December 2010 issue of Paper Crafts (Thanks Paper Crafts!). Make sure you check out the current issue. It's filled with great holiday ideas!


My project is an online bonus feature so you can see it here. Since it's time to ring those Xmas bells soon, I felt it was time to share this little project on the blog as well.


Thanks for stopping by and have a fabulous day!

Wednesday, November 17, 2010

WMS November Customer Waltz - Candle Tutorial

ETA: I have never had issues with burning the tissue paper -- if you are worried, I'd suggest punching a slightly larger hole where you thread the wick

Welcome to the WMS Customer Waltz! You should be sure to check out all the fabulous projects at the WMS forum! :) And as usual, there's a fun game as well. Spot all the watermarks in the WMS DT member's photos and you could win a fun prize. We might have 0 watermarks, 1,2, 3 or more!

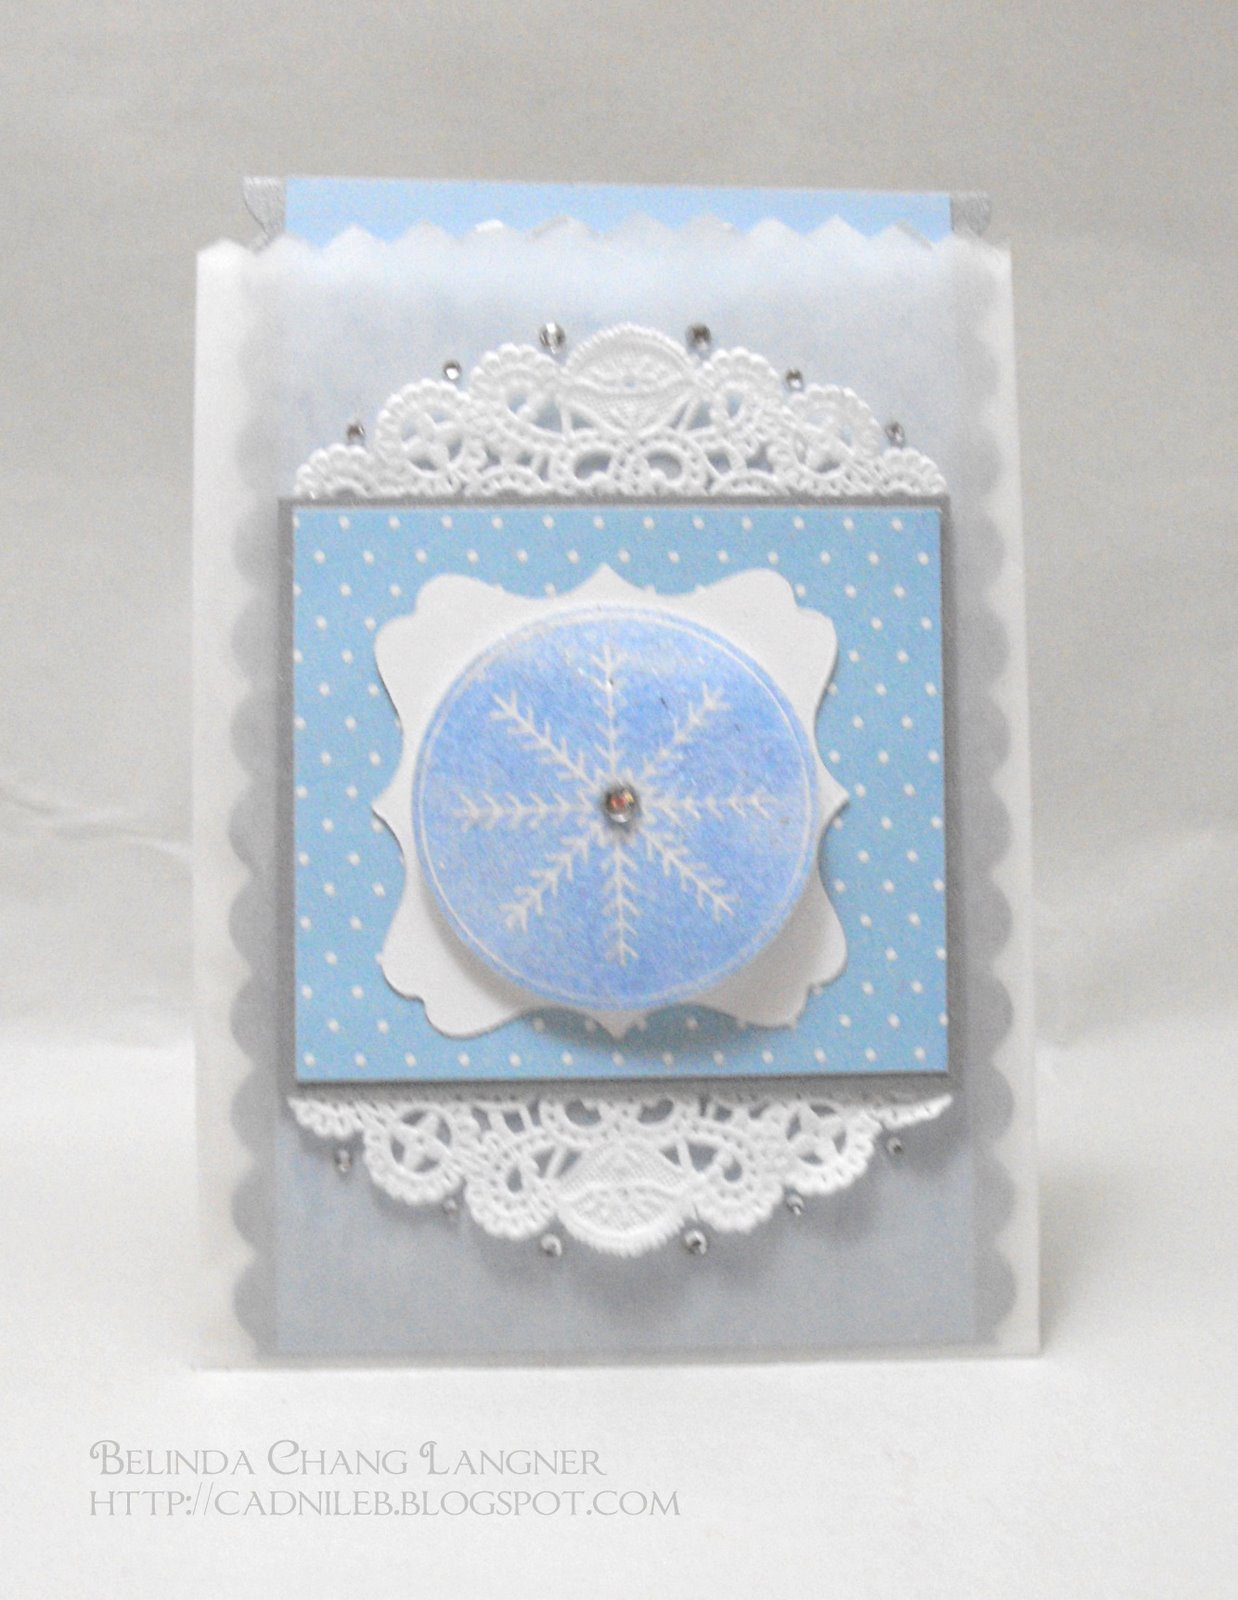
This month's theme is Christmas so I figured I'd share a Christmas gift idea. I made a set of candles the other weekend and I thought I'd share the process. I'm one of those people that needs to hand out "perfect" candles... so I had my husband dig through our mini tea light candles to find perfect ones for this gift set.

That said, I don't have enough to create one for each family member as I originally intended. Perhaps... I'll get my bum out to pick up more or one lucky person will just get this "Belinda" original. It's really starting to look like the later as the Xmas season stresses me out. My perfectionist tendencies are not optimal for the gift frenzy season.


So let's get started shall we? These are actually really quick to make and they look fabulous. It always amazes me how much you can do with a little tissue paper and some wax.

 1. Gather your supplies - I used a 1 3/8 inch circle punch, snowflake from Seasons of Love - Tags, ink, tissue paper, and candles


2. Stamp the snowflake onto the tissue paper. I usually test an image by placing it onto my candle to see what works best.


 3. Punch out your snowflakes. To give my tissue paper more umph, I slip a post-it note behind so that I get a clean punch.


 4. Punch a hole in the middle of your snowflake


 5. Thread the tissue paper snowflakes onto your candle.


 6. Using your trusty heat gun, apply heat until the wax starts to melt. It'll pull the tissue paper in (and I keep a paper piercer nearby that I use to help it along). Be careful not to hold the heat too long or it'll burn the tissue paper.


 6. Ta da! You have pretty candles. Now wrap them up all nice and tight. Add some pretty decorations and you have a great Xmas gift.

 7. I'm going to admit, I usually eye the boxes. I place three candles on the paper, mark the edges and score them. Then I measure the height of the candle. I determined it was 6/8 inches so I scored two lines in each direction 6/8 inches apart.

 8. Using some oragami skills, I cut some corners, folded and created a box.  (Ok, I apologize for this part of the tutorial. If there is interest, I can do a better box tutorial. Unfortunately, I tend to just use a little simple math usually to get my box and never write down measurements).


9. Decorate the box as you see fit.


Stamps: (Seasons of Love - Tags) Waltzingmouse Stamps
Cardstock: Bazzill, (acrylic) Office Max
Patterned Paper: (Colorful Christmas) My Mind's Eye
Fibers: (ribbon) American Crafts, (silver twine)
Accents: (button) Making Memories, (gems) Hero Arts
Tools: (circle punches) EK Success

Thursday, November 11, 2010

Christmas Thank Yous

Before we begin, I just wanted to remind everyone that today is Veteran's Day. Thank you to those who have served, to those currently serving, and especially those who have given their lives for our country. May God Bless you and your families.

I don't know about you guys, but I still write Christmas thank you notes. My husband tells me every year that there's no need to bother but I still feel like it needs to be said. And I'll be honest, every year I forget one or two people.... but not this year as I decided to start my Christmas thank you cards early!

Maybe it's just me but I hate make the same card twice. I'm not a mass producer. If I'm using the same layout, I'll try using different colors. If I'm using the same image, I'll use different layouts.  I picked one of the images from the set Around Christmastime and did 3 different layouts with it.

One of the things I've noticed is that people tend to like interactive cards. So this year, I opted to do some as pocket cards. I used some glassine bags I have and trimmed the edges with my decorative edge scissors. And then I went to town.

They're all different in their own way -- Sometimes I inked the edges.
 
This one used a touch of a lace doily.

And who says you need a sentiment? Sometimes its the inside that counts!  (Ok and I couldn't figure out a good place to add the sentiment so sue me). 

Thanks for stopping by!


Stamps: (Around Christmastime, Frame It, Fancy Phrases) Waltzingmouse Stamps
Cardstock, Patterned Paper: PTI
Accents: (gems) Hero Arts, (doiles) Wilton, (stick pin) Making Memories
Tools: (dies) Spellbinders, (1 3/4 inch circle punch) Fiskars, (scallop border punch) Fiskars

Tuesday, November 9, 2010

Joy

Happy Hump Day everyone (or almost Hump Day, depends on when you actually read this)! Hope your week is going well so far!

Thanksgiving is fast approaching and I've finalized my Thanksgiving Menu! :) Every year I pick a somewhat healthy menu and the hubs and I battle it out. He tries to make it more fatty and I try so hard to hold my ground. 

So excited that I managed to hold my ground somewhat this year -- we'll be having a lentil and carrot salad and a butternut squash barley pilaf in lieu of bread stuffing. Some mashed taters and green beans should balance that off nicely (no matter how hard I tried, I couldn't get my hubs to let go of those for something fancier). Oh it's going to be fabulous.

I wanted to do a swiss chard and sweet potato gratin which sounded amazing, but I got talked out of it for a simple sweet potato gratin. While I know my hubs will eat swiss chard, last year, none of the other guests touched the chard - which is fine cos it's more for ME! (I adore swiss chard, actually, I adore my greens in general). However, the "me me me" mentality isn't exactly the spirit of Thanksgiving so I took out the chard (so sad).

Anyways, enough of my food woes. I have another fun card to share with you all. 

This is just another quicky card that I created using Festive Foliage. If you look closely, you'll see that the card front ends with the gold edge. The brown you see peeking through is actually the back of the card. I find these cards just kinda fun. :)

While I made this card for Christmas, it could totally work for other occassions. If you changed the sentiment, you could make this a card for any season - birthdays, thinking of you... the possibilities are endless.

Stamps: (Festive Foliage, sentiment from Vintage Ornaments) Waltzingmouse Stamps
Cardstock: (Gold, Cream, Brown) PTI
Ink: Versamark, (brown) PTI
Embossing Powder: (gold) Ranger
Fibers: (ribbon) PTI