Showing posts with label tutorial. Show all posts

Wednesday, January 26, 2011

Happy Birthday Claire

Happy Birthday to you,
Happy Birthday dear Claire,
Happy Birthday to you!

We're having a birthday blog hop for the ever so lovely Claire! You should have come here from Laurie's blog. If you get lost along the way, make sure to check the WMS blog for the full list.

So here's my little happy birthday card.


No, there's no WMS banners ... yet ...
But banners are the perfect birthday accent, aren't they? ;-)

So how did I create the banners?
Seasons of Love - Tags. Heck yeah.

I stamped the corner of the star from the set onto a sheet of paper. In all sorts of fun colors.

Then trimmed these puppies out.

Sketch the arch for the banner string. Pierce holes.

Stitch and go. Watch the Bachelor while doing so. Yell at the TV as if they can hear you. Accidentally, skip a stitch... *shrug*  Sometimes you just need your Bachelor fix.

Happy birthday, Claire! Hope it's a banner year! ;-)

Next up, the wonderful Jennifer! I know she has something wonderful up her sleeve.


Stamps: (Seasons of Love - Tags, Half Pint Heroes) Waltzingmouse Stamps
Cardstock, Ink: Papertrey Ink
Fibers: silver jewelry thread

Friday, December 10, 2010

Waltzingmouse Twelve Days of Christmas

ETA: I created the hat from paper. Added some more details to step 6


Hi there! I am pleased to be your hostess this morning for Day 5 of the Twelve Days of Christmas, Waltzingmouse Style! Be sure to check out the WMS Blog for the past few days and for the upcoming days!

Normally at this time we would be previewing new stamp sets for release. However, this month WMS is taking a break from releasing new stamps to allow us (all!) to enjoy the holidays with family and friends, as well as to focus on some fantastic things happening behind-the-scenes! It is all very exciting, and we appreciate your enthusiasm!

In lieu of a release this month, we are instead coming together to bring you some ideas and inspiration for holiday crafting (and beyond) which we are calling the Twelve Days of Christmas, Waltzingmouse Style! Each day will showcase a different Design Team member, so be sure to check the WMS Blog daily through December 17th for the links.

So on the 5th day of Christmas, I present a fun little gift for your friends, family and neighbors.

I present to you snowmen spa tubes. :) They're something you can make for the young at heart or even let the little ones help. I know most of us are super busy around this time so I wanted to create something relatively easy to mass produce as well.

I filled some test tubes with bath salts -- after the stressful holidays, the recipient can relax in their own tub. To make the tubes festive, I decided to make my tube a snowman. And what snowman can go to his new home without a snazzy carrier?


Just because I used bath salts, doesn't mean you have to -- you can really fill it with anything. You can fill it with hot cocoa, bath salts, jelly beans, nuts, the list goes on. Since it's chilly outside, I made some hot cocoa ones (layers of hot cocoa, chocolate chips and marshmallows) as well - yum!

I took some pictures while making this little snowmen in case you'd like to try them as well.

1. Gather your supplies.
  • Test Tube(s) - Mine are 6 inches with a 1 inch diameter that I got from Etsy (In the Clear).
  • Gems
  • Ribbon
  • Adhesive
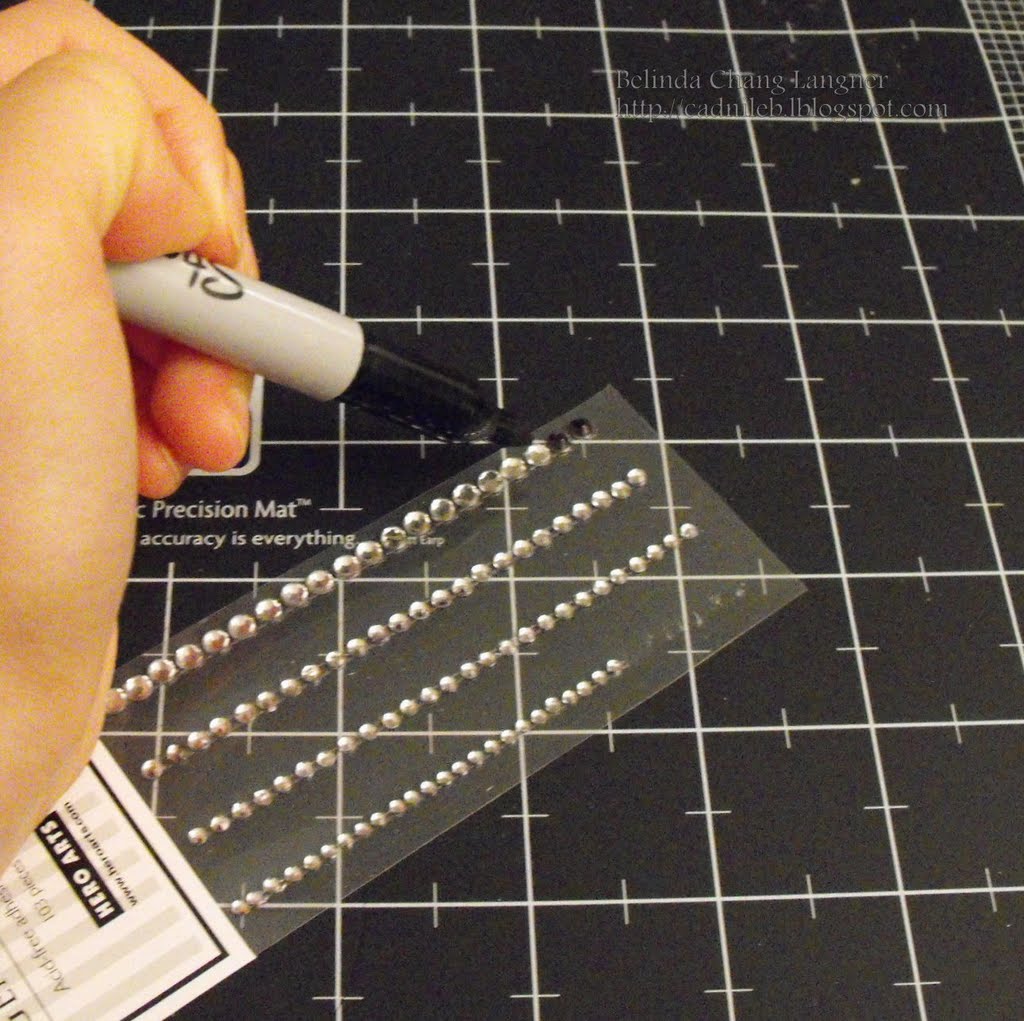
2. (Optional) Color your gems. I don't have black gems so I used a Sharpie marker to color my gems black.

3. Adhere gems to your test tube (which I had already filled with bath salts (so you can see the gems)

4. Cut and color your snowman nose. I used the end of a wooden skewer which I made my husband saw for me which then caused him to curse all things craft as he hurt his finger. Carrie told me that I should have used garden shears instead (if only we owned such things).

5. Tie ribbon around snowman. You can see right now that one end sticks up...

6. With a glue dot, adhere the ribbon down. Finish decorating the snowman as you see fit.
For the hat, I wrapped a thin strip of black paper around the tube. The hat lid is created by creating a ring with my circle punches (outer diameter is 1 3/8 inch and the inner diameter is 1 1/8).

If you run out of time, you could just tie a tag to the snowman's scarf and stop here.

7. Create box. Cut a 8.5" by 5" cardstock. (This means you can create 2 boxes with one piece of cardstock). Place it in the landscape direction and score at 1.5", 3.5", 5", and 7".

8. Turn it in the portrait direction and score at 1.5" and 3.5".

9. Make 1.5" cuts from the top of the page and from the bottom.

10. Use the nesties to cut a circle.

11. Assemble the box. Cut two 2" by 8.5" pieces of acrylic cardstock for the sides of the holder. I used the SU! word window punch to punch handles for my holder, scored my acrylic sheet one end at the 2 inch mark (for the base) and the at the other end at the 1 3/4 inch mark and the 2 3/4 inch mark.

12. Decorate your box as you see fit and place your snowman in. For the box, I stamped the pattern from Pic-Nic Patterns and created a simple little band with the let it snow sentiment from Compliments of the Season. I created a little tag for the top and tied it with a bit of silver twine.

Hope you enjoyed the 5th day of the Twelve Days of WMS Christmas. Thanks for stopping by!


Stamps: (Compliments of the Season, Pic-Nic Patterns, Half Baked, Around Christmastime )
Accents: (gems) Hero Arts
Fibers: (ribbon) Craft Supply, (silver twine) Jewelry Essentials
Tools: (Word Window Punch) SU!, (circle die) Spellbinders
Other: (tubes) In the Clear Etsy Shop, (skewers)

Wednesday, November 17, 2010

WMS November Customer Waltz - Candle Tutorial

ETA: I have never had issues with burning the tissue paper -- if you are worried, I'd suggest punching a slightly larger hole where you thread the wick

Welcome to the WMS Customer Waltz! You should be sure to check out all the fabulous projects at the WMS forum! :) And as usual, there's a fun game as well. Spot all the watermarks in the WMS DT member's photos and you could win a fun prize. We might have 0 watermarks, 1,2, 3 or more!

This month's theme is Christmas so I figured I'd share a Christmas gift idea. I made a set of candles the other weekend and I thought I'd share the process. I'm one of those people that needs to hand out "perfect" candles... so I had my husband dig through our mini tea light candles to find perfect ones for this gift set.

That said, I don't have enough to create one for each family member as I originally intended. Perhaps... I'll get my bum out to pick up more or one lucky person will just get this "Belinda" original. It's really starting to look like the later as the Xmas season stresses me out. My perfectionist tendencies are not optimal for the gift frenzy season.


So let's get started shall we? These are actually really quick to make and they look fabulous. It always amazes me how much you can do with a little tissue paper and some wax.

 1. Gather your supplies - I used a 1 3/8 inch circle punch, snowflake from Seasons of Love - Tags, ink, tissue paper, and candles


2. Stamp the snowflake onto the tissue paper. I usually test an image by placing it onto my candle to see what works best.


 3. Punch out your snowflakes. To give my tissue paper more umph, I slip a post-it note behind so that I get a clean punch.


 4. Punch a hole in the middle of your snowflake


 5. Thread the tissue paper snowflakes onto your candle.


 6. Using your trusty heat gun, apply heat until the wax starts to melt. It'll pull the tissue paper in (and I keep a paper piercer nearby that I use to help it along). Be careful not to hold the heat too long or it'll burn the tissue paper.


 6. Ta da! You have pretty candles. Now wrap them up all nice and tight. Add some pretty decorations and you have a great Xmas gift.

 7. I'm going to admit, I usually eye the boxes. I place three candles on the paper, mark the edges and score them. Then I measure the height of the candle. I determined it was 6/8 inches so I scored two lines in each direction 6/8 inches apart.

 8. Using some oragami skills, I cut some corners, folded and created a box.  (Ok, I apologize for this part of the tutorial. If there is interest, I can do a better box tutorial. Unfortunately, I tend to just use a little simple math usually to get my box and never write down measurements).


9. Decorate the box as you see fit.


Stamps: (Seasons of Love - Tags) Waltzingmouse Stamps
Cardstock: Bazzill, (acrylic) Office Max
Patterned Paper: (Colorful Christmas) My Mind's Eye
Fibers: (ribbon) American Crafts, (silver twine)
Accents: (button) Making Memories, (gems) Hero Arts
Tools: (circle punches) EK Success

Friday, May 28, 2010

Accordion Rosette Tutorial

I've had a few questions about the rosette I made here so I just did a simple tutorial to help you make one as well.

1. Cut 2 strips of paper 12 inches long with the same width. The width of the paper strips determines how large your rosette will be. As an option, you can punch the border as well.

**Note: The length of your strip along with the scoring distance will impact the tightness of your rosette. I recommend doing longer strips initially since it's easier to make the rosette (less fiddling).

2. Score the paper evenly. I use every 1/2 inch, for tighter rosettes, score more often and looser ones, less often.

3. Accordion fold both strips.

4. The final folded pieces should look like this.

5. Adhere the ends together well. Adhere glue to a small circle (where the radius is smaller than the height of your strip!!!)

5. Fold the sides inwards onto the scrap circle with glue, let the bottom fan out. Fiddle around until you get your accordion flower.

And here's a fun card that I incorporated the flower into!


I went for a more patterned paper focused card again. Now that I have even less time (with my new study schedule), patterned paper is a great way to find a fun pattern and make a quick card.


Cardstock, Stamps, Ink: PTI
Patterned Paper: (Quite Contrary) My Mind's Eye
Accents: (gems) Zva
Tools: (punch) Fiskars

Wednesday, May 12, 2010

Hello Friend

Hope you're all having a good weekend! I'm back to cleaning -- took a little birthday weekend break but we're back at it now. It never seems to end does it? And we live in a little 2 bedroom apt so I can't even begin to imagine having to clean a house....

I wanted to create a simple card to send to a friend. I pulled out Asian Garden from WMS again. Adore it!

I love that you can customize the tree how you see fit and you can even perch items on the tree or hang things from it!

The backing does have a woodgrain pattern on it which you can't see in the photo... but the closeup is showing up ok.


Haha, so in her blog post, Claire mentioned the comb trick I like to do to mimic woodgrain. And I have to admit, I didn't think about it at all for use with Asian Gardens. I tend to be a "what do I see in front of me" crafter. And I had already cleaned my husband's comb and put it back... just kidding!

None of my husband's combs were harmed in the making of this card (and my dear dear hubs, if you read this, you will notice the photos use my little girly comb)

I thought I'd take some photos as I did it just in case you have a comb near by. And at worst case, I believe they're super cheap at your local drugstore.

1. Ink up your stamp. If you do multiple cards, I like to clean the stamp a little by rubbing it on my scrubber for cleaner lines (clean the comb too!!). Trust me on that... sometimes the lines carry over a little from inking to inking.

The ink doesn't matter. That said, I do like pigment ink better for this trick but I actually am using the Palette hybrid ink here.

2. Take a comb and just lightly run it across your stamp.

3. You can see your pattern. If its not perfect, no biggie. It's woodgrain, its not perfect in real life!
Try different sized combs for different effects -- if you're anything like me, you own a gazillion combs. You could also go over certain lines with a toothpick or needle to get some more detail.

If you miss a spot, just go back over it with your comb again.


There ya go! A simple way to get a wood effect and using something you can usually ask a hotel front desk for! (How did you think I got to own so many combs?)

I think a little stamp kissing on this trunk would be pretty neat as well -- like that lattice background from Picnic Patterns... hmm.... perhaps next week! :)